Sweetbriar Sisters

Adorable Sewing Patterns

  • Hey There!
  • Wholesale
  • Blog
  • FREE PATTERNS!
  • SHOP

Splendid Snowmen Sew Along Week 2

October 28, 2014

Week 2 of our Splendid Snowmen Sew Along is upon us.  How did your first week go?  I have to admit, sewing all the little advent pieces is where I always lose patience- so let’s all give ourselves a pat on the back for getting those out of the way!   

This week we’re going to work on steps 3-5 in the pattern, which includes marking our pocket placement and appliqueing the center design (don’t worry, if you use buttons for the snowmen, there are only 8 applique pieces this week- not 24!)

Here we go- don’t forget to share your progress shots with #SplendidSnowmen on your favorite social media site!

Marking Pocket Placement

marking sky piece

Those faint red lines mark where our pockets will go, which helps us see how to center our design.

Nothing too complicated here, we just need to mark our background fabric to be sure we know where to place our snowmen, trees and ground.  I know it’s tempting to skip some of the ‘marking’ steps- but I’d really suggest marking your fabric on this one!  If you don’t already have a removable marking pen, I’d definitely suggest a Frixion pen to get started.


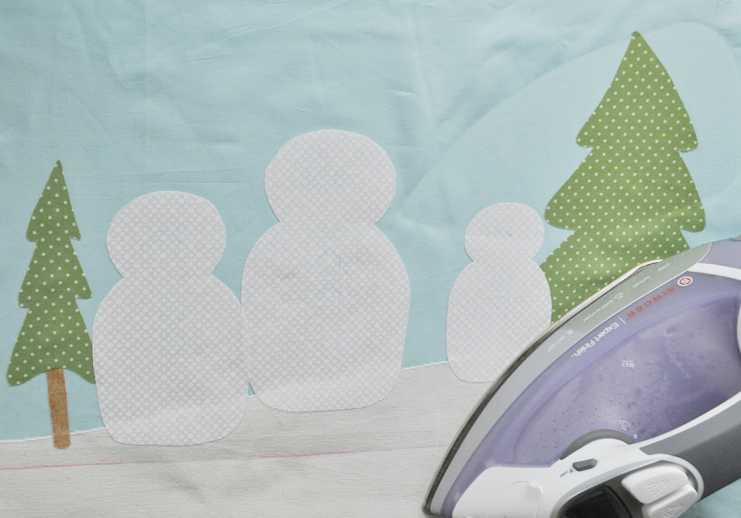
Making Snowmen, Trees and Ground Pieces

After last week, you’re a pro at applique.  This week is basically the same old story.  This week we’ll be working with some larger pieces, and instead of ironing our pieces onto a background of felt we’ll be ironing onto our sky fabric.  Let’s take a look at what those changes mean.

cutting double stick interfacing copy
First off, lets talk about those bigger applique pieces.  The trees are larger shapes, and I plan on quilting the inside of the greenery so I want the fabric to stay nice and soft. We really only need the fusible adhesive around the edges of the big shapes to keep them from fraying and to keep them in place.  Once you trace your large shapes onto the paper side of your adhesive, you can cut out the inside of the shape about a 1/4″ in from the traced line. The above photo is a good example of what that will look like as you iron your adhesive onto the back of your fabrics.  (The rectangles at the bottom are tree trunks and are small enough I didn’t worry about cutting any access adhesive in the middle of the design.)
iron on applique copy
Once you’ve got your applique pieces cut out of the appropriate fabrics, it’s time to arrange them on the Sky background fabric.  Last week, our placement on this step wasn’t important because we were cutting the pieces out of the felt background fabric.  This week we’re making a permanent layout- so it’s worth taking a few minutes and making sure you like where everything is.  It might even make sense to pull out your applique pieces and dress up your snowmen to make sure you’ve got room on each snowman for all the accessories to fit.  Remember that everything outside of the Pocket Placement Guides that we drew onto our sky piece will be covered with our pockets.  I think it looks nice to crop the scene just a little and have the trees poke behind the pockets- but you can place them however you like them.
 
When you have your snowmen, trees and ground piece just where you want them, iron them in place.  This will stick them to the background fabric so they’ll stay where you want them while you sew them on.  (Note that you’ll cover up some of your pocket placement marks, so you’ll want to redraw those over your applique pieces)

Finishing Snowmen, Trees and Ground Pieces

snowman applique detail

sewn applique copy

All sewn up

Now it’s time to sew those applique pieces in place!  Traditionally a blanket stitch is used for this step, but you can use a variety of stitches.  On my design, the stitch used on the tree is a blanket stitch.  I used a nice, tight zigzag stitch on the ground piece because the fabric I used has a bigger weave and frays more easily than normal quilting cotton.  Zigzags are great for holding in fraying threads.  You can use just about any stitch you like for your design.  Something as simple as a straight stitch looks great.  So does using a different decorative stitch on each item.  The style is up to you- pick what you love!

button eyes

Buttons for eyes

Time Saving Technique #1: Using buttons for the snowmen makes the appliqueing go a bit faster, (sewing those little eyes can get a bit fussy) but you can applique their eyes and buttons with fabric or felt if you prefer.  I found some cute round black buttons at my local Joann Fabrics that made great eyes, and I had a blast raiding my button stash for their other, colorful buttons.  The pattern calls for specific sizes here, but you can feel free to change those sizes a bit.  Just make sure you’ll still be able to put their clothes on over the top when the time comes!

snowmenHere’s how your center design should look at the end of this week’s assignment! (*note* I sewed on my buttons a little early to show you how they’ll look in place of the applique pieces, HOWEVER- you might want to hold off on sewing on your buttons until AFTER you quilt your advent. )

Extra Credit:  If you know next week will be busy, go ahead and cut out your pocket pieces and prepare them for marking (Steps 6 & 7)

Christmas, Kids' Stuff, Patterns, Sewing · 9 Comments

« New Pattern! Gerald the Giraffe
Dark Chocolate Nutella Halloween Brownies »

Comments

  1. sue says

    October 29, 2014 at 3:10 am

    I love it! Very exciting.

    Reply
    • Jessica says

      October 29, 2014 at 12:29 pm

      Thanks Sue!

      Reply
  2. linddylou says

    October 29, 2014 at 5:31 pm

    Hi, I know you made a revision for the snow but I can not find it. Please help.

    Reply
    • Jessica says

      October 29, 2014 at 6:22 pm

      You’ll want the snow to be an inch higher than it said in the testing pattern. Here’s the new, corrected image on how to cut it out- corrected snow pattern

      Reply
  3. Marilyn S says

    November 1, 2014 at 1:54 am

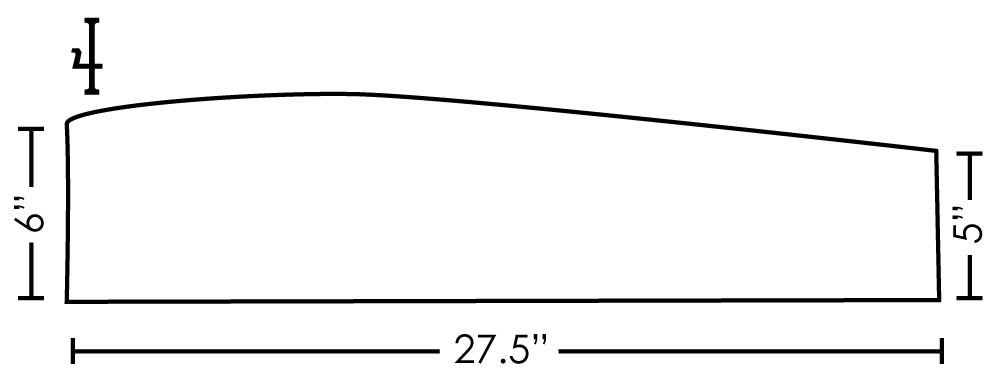
    I’m going back through the advent pieces and am only finding one bird pattern. It is on the second page of the applique patterns. Also, in the instructions you say we need a piece of “double sided interfacing”. Maybe I am being too picky, but I believe the correct item called “fusible web or webbing”. Interfacing is what is used to add body to a collar, shirt front or waist band. This is a fun project!!

    Reply
    • Jessica says

      November 1, 2014 at 1:20 pm

      Marilyn- Please be picky! That’s exactly what I want from a tester! I will go and look up the official terms for fusible web to make sure I’ve get it just right in the instructions.

      As for the bird, the photo I sent out for testers is of the first version of my advent. As I went and made the pattern for it, I realized I had 25 pieces on there and only 24 pockets (whoops!) so before I sent the pattern out for you guys I took off a bird to make 24. You are not the first to notice the 2nd bird, so I will definitely be taking a new photo for the official pattern!

      Reply
  4. Marilyn S says

    November 1, 2014 at 8:12 pm

    I actually want to make the cute second bird. I want to fuse the carrot noses on and add a couple more ornaments to the tree. Is that okay? I don’t want to stray too far from your pattern (but I’m afraid of losing the little carrots). Thanks!

    Reply
  5. Jamie says

    November 4, 2014 at 9:17 pm

    Quick question about the order of appliqué. Did you sew the snow piece on before you ironed on the snowmen and trees? Or did you just iron everything on and then sew them all?

    Reply
    • Jessica says

      November 6, 2014 at 1:59 pm

      Jamie- I just ironed them all on and sewed them all at the same time.

      Reply

Leave a Reply Cancel reply

Your email address will not be published. Required fields are marked *

  • Facebook
  • Instagram
  • Pinterest
  • YouTube

Hi, I’m Jessica

I’m on a mission to create handmade items that are cherished for years to come. I hope you’ll join me along the way!

Join the Club

Join our Sewing Club and be the first to hear about new patterns and tutorials.


Thank you!

You have successfully joined our subscriber list.


Check Out Our eBooks

Fancy Flock eBook cover


  • About
  • Materials
  • Shop
  • Contact
  • Selling Items Made With Our Patterns
  • blog
  • Pattern Testers

sweetbriarsisters

Sew handmade gifts that will be cherished forever with Sweetbriar Sisters patterns
Share your creations with #sweetbriarsisters

Instagram post 2327252897543629252_417393240 It is finally getting warm here and I'm so excited for long days in sunny fields.
Instagram post 2321314328934193695_417393240 Did you know that ladies during the Regency Era often wore a shawl because the breezy empire waist gowns they wore were a little chilly? ⁣
⁣
I've been having so much fun adding historical details to this project. I love the idea of history seeping into a child's mind through play.⁣
⁣
I know it's just a tiny detail, but I wanted our dolls to have shawls because I keep reading about the huge cultural shift that came with the style we see in Jane Austen's time period.⁣
⁣
In a period of about 15 years we went from Marie Antoinette style gowns with huge, structured skirts, to these breezy gowns that might (gasp!) show your silhouette if a breeze came in.⁣
⁣
To the younger generation they were progressive. Napoleon's wife was the one who made the style popular and because of her influence it symbolized a new way of thinking. (Marie Antoinette's way of thinking was, after all, proven slightly ineffective.) ⁣
⁣
Sure, the dress was a little chilly. But it was a way to leave dated ideas in the past. So they grabbed a shawl and moved forward!⁣
⁣
I know that a shawl on a doll won't automatically teach a kid all that history. But it might give us the opportunity to tell the story as we play, and I want to add as many of those opportunities as I can.
Instagram post 2320150626645961038_417393240 What's the best glue gun out there?⁣
⁣
I love the ease of hot glue, but have always found my glue gun work rather sloppy.⁣
⁣
A while back I talked to my good friend Erin from @thegreyrose about this. She is the closest thing to a Glue Gun Expert there is: She uses a glue gun full time to create her amazing felt floral arrangements. Her work is delicate and skillful, which are words I'd never use to describe my own glue gun efforts.⁣
⁣
Her secret is this amazing detail tipped glue gun. (The Surebonder Detail Tip Glue Gun...Please note, this is NOT an ad. No one is paying me to review this thing. I just genuinely like it and thought I'd share.)⁣
⁣
I bought the exact model she uses for her work and I will never go back! For the first time I feel like my hot gluing can be clean and precise. It's amazing what a difference having the right tool can make.
Instagram post 2318523881759128711_417393240 amen.
Instagram post 2316180582466133425_417393240 The bonnets are finished and I'm off to work on top hats and cravats. Because we definitely need a Mr. Darcy Rabbit.
Instagram post 2315017019194132946_417393240 The next Jane Austen play set tutorial is up and running on our blog!⁣
⁣
This week we make bonnets and shawls to complete for our Regency bunnies and I can hardly contain my excitement.⁣
⁣
Link in bio -> @sweetbriarsisters
Load More... Follow on Instagram
This error message is only visible to WordPress admins
This endpoint has been retired

Copyright © 2022 · Sweetbriar Sisters · Hello You Designs