
Let’s be honest, sewing together convex and concave curves is one of the more annoying things in sewing. I’ve been writing up a new pattern (a rocketship! I’m so excited) and, after several attempts I finally gave in to the fact that the window would simply have to be created with a concave/convex combo (sorry guys!).
But if I’m going to put an annoying step in a pattern, I at least want to describe the best way to deal with it. So today I did a little test run on opposing curves. I looked up a few of the more popular techniques to see which worked best, the winner would make it into my pattern instructions. Here’s what I found:

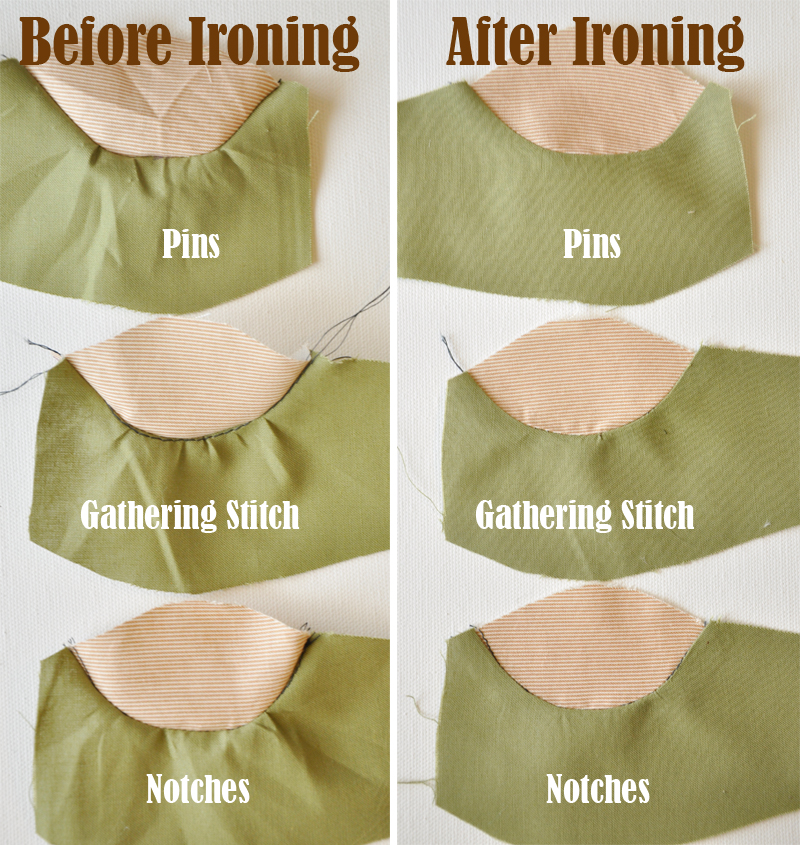
Method 1: Tons o’ Pins
The first method was simple. Take the curves and pin them together with a ton of pins. To make sure things worked evenly, I pinned the two ends of the curve first. Then I matched the middle of the curves and was able to pin in between the three pins without any major puckering or bunching. Prepping the curves this way, in comparison to the other methods, went quickly and easily. And, in the end, this is the method that got me a perfect result (though, the other two methods resulted in only a teeny, tiny pucker each as seen in the last photo). However, I do admit it was a little stressful to sew around so many pins.

Method 2: Gathering Stitch
Another simple method was the gathering stitch. I set my machine’s stitch length as high as it would go and sewed down the concave curve. You don’t actually gather the curve afterwards (despite the name of the stitch used), but having the seam there helps you ease the fabric into the shape you need it to go. I found that if I pulled one end of the thread slightly (like I was about to gather the fabric), the curve would pull almost straight, allowing me to fit it to the convex curve much easier.

Method 3: Cutting Notches
Alright, this was obviously the most complicated method as far as prep work goes. However, it was also definitely the easiest to sew. (my final curve did get a small pucker- as shown below- from this method, but I actually think it was because I was feeling so at ease that I didn’t put as much care into it as I did with the other methods). To use this method, you’ll start by sewing a seam 1/4″ into each curve (you don’t sew the pieces together yet, you’re just marking where they’ll meet). I would suggest using a gathering stitch for these seams, since you’ll want to pull them out later if they’re showing. Also note, if your seam allowance is different than 1/4″, you’ll use that measurement when sewing these placement seams.
Once your pieces are marked, take the concave curve and cut notches out along the edge. Make sure you do not cut past the placement seam. Once your notches are cut, the concave curve will easily stretch open to match the curve of the convex seam. Match the two placement seams as you pin your pieces together for sewing, switch your machine back to a normal stitch length (smaller than the gathering stitch) and sew away.

Conclusion:
So which method was best? I really thought one would stand out above the others, but to be honest, they all worked great. If I had to give an official opinion, I’d say a combination of all three would work the best. I’d probably sew the gathering stitch, clip a few notches and then pin very well. To finish up, I’d definitely iron with lots of steam (I added the pre-iron shots in case you’re like me and get tempted to skip that step. I think ironing was actually the thing that made these look the best!)
But, when I sew I like to enjoy myself more than I like to make things absolutely perfect. Personally, I tend to get bored of working carefully, so unless I’m making a super duper special keepsake, I think I’d stick with the method with the least prep work. That way I can save my patience for when I’m actually sewing the seam rather than getting bored before I’ve even started :).
Whatever method you choose, you should be just fine. I vote you find the method that works with your sewing personality, and get sewing!
Fantastic review of the 3 methods. Thank you! I have never tried this- I always stick to applique when I sew anything other than straight edges. You have helped me get over my fear of curves- I will give this a go!
Thanks Eva! You should definitely try it out- it’s not as bad as it looks!
Hi Jessica – this is a great post, thank you. I can’t wait to try the technique for the quilt I am currently working. I will have to take a better look through your site – I found this specific page via Pinterest and the details of your writing and images are just what I needed. I’ve not sewn curves yet. Thank you.
Pins always for me, the finer the better. The best are the tiny brass sequin/ appliqué pins. Machine just skips straight over them.
I will have to try out sequin pins! Thanks for the suggestion Lorna!
My preferred method is not for the faint of heart, or so I’m told: I don’t pin, stitch, or clip (well, I clip curves after I sew the seam). It takes some practice, but it works for me.
mimstrel- I like your style 🙂
I was just running into this problem last night. I put it down and walked away. Now I can’t wait to give all three methods a try. Thank you!
I’m glad to give a bit of inspiration 🙂
I’m glad to know pressing with steam helps,I have tried clipping and steam press. Thanks works really well for me .
I think i left a review for Dalton but I think it got lost who knew, if it did I am so happy to tell you how much I LOVE Dalton I made him for my granddaughter and the only part I couldn’t do was his belly!!!!! I book marked your directions. I have to wait to buy the pattern with the big him the small him and the egg I loved him when I found him 3 or more years ago it reminded me of where he and i started and how I saw him for the first time since I mailed him to my granddaughter Sky when I got a plane ticket to Virgina for Christmas. Here I am 53 years old and I have tears loving tears for me for you and how a small little dragon has meant more to me then I knew. Thank you making him and giving him his perfect name, Dalton.
Just a note i also an (invisible) disability and I have your same thoughts. So know in your heart I understand and I am proud at how you were able write about CFS and stand up to the world.